Ever found yourself staring at a wall, drill in hand, wondering if you’ve grabbed the right anchor for the job? Perhaps you’ve experienced the frustration of a fixture pulling away from the wall because the anchor simply didn’t hold? Or maybe you’re tackling your first DIY project and feeling overwhelmed by the sheer variety of wall fixings available at your local hardware store?
You’re definitely not alone. Nylon nail-in anchors are one of those brilliant little fixings that can make mounting tasks incredibly straightforward—when you know how to use them properly. These versatile anchors have become a staple in Australian homes and workshops, offering a quick and reliable solution for securing everything from picture frames to cable clips on masonry surfaces.
In this guide, we’ll walk you through everything you need to know about using nylon nail in anchor like a pro. From understanding how they work to choosing the right size, avoiding common mistakes, and even removing them without damaging your walls—we’ve got you covered. Whether you’re a weekend warrior or a seasoned DIY enthusiast, these practical tips will help you achieve secure, long-lasting results every single time.
What Are Nylon Nail-In Anchors and How Do They Work?
Understanding the Anatomy of a Nail-In Anchor
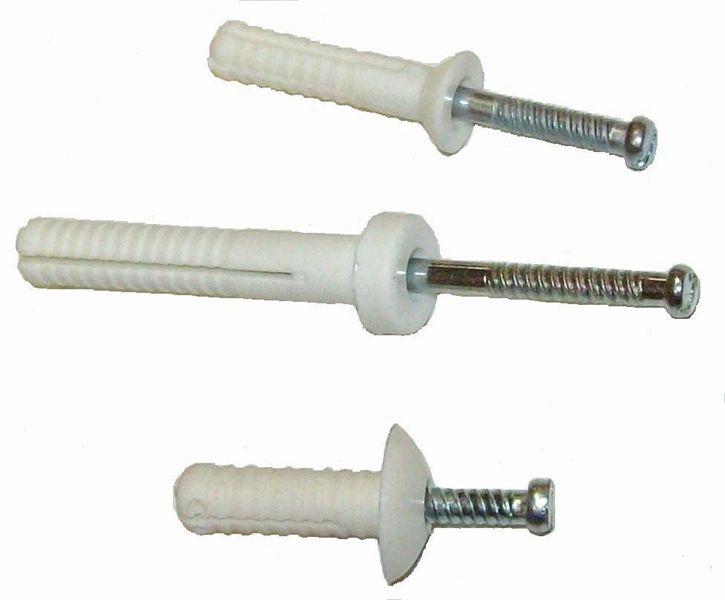
A nylon nail-in anchor consists of two main components: a nylon sleeve (the anchor body) and a pre-fitted nail or pin. The sleeve features a specially designed expansion zone with splits or fins along its length. When you drive the nail into the anchor, these sections spread outward, gripping the surrounding material.
The beauty of nylon as a material lies in its durability and flexibility. It won’t rust, corrode, or degrade over time, making it ideal for both indoor and outdoor applications. Plus, nylon anchors work brilliantly in a range of temperatures without becoming brittle or losing their grip.
How the Expansion Mechanism Creates a Secure Hold
Here’s the clever bit. When you hammer the nail into the nylon sleeve, the nail forces the anchor to expand within the drilled hole. This expansion creates friction against the walls of the hole, locking the anchor firmly in place. The tighter the fit, the stronger the hold—which is precisely why drilling the correct hole size matters so much.
When Should You Use Nylon Nail-In Anchors?
Ideal Applications for Lightweight to Medium Fixtures
Nylon nail in anchor shine when you’re mounting lightweight to medium-weight items. Think smoke detectors, conduit clips, cable trays, small shelving brackets, picture frames, and light fixtures. They’re particularly popular for electrical installations where you need to secure wiring or junction boxes quickly.
The speed factor makes them brilliant for repetitive tasks. If you’re running cables across a wall and need to fix multiple clips, nail-in anchors let you work efficiently without fiddling with separate screws and plugs.
Best Wall Types for Nylon Anchors (Brick, Concrete, Masonry)
These anchors perform best in solid materials. Brick, concrete, blockwork, and natural stone are all excellent candidates. The key is that the base material needs to be dense enough to allow the expansion mechanism to create proper friction.
For Australian homes, this typically means exterior walls, garage walls, concrete floors, or any rendered masonry surface. Always check what’s behind the surface before drilling—you don’t want any surprises.
When to Choose a Different Anchor Type
Nylon nail-in anchors aren’t suitable for every situation. If you’re dealing with hollow walls, plasterboard, or extremely soft materials, you’ll want to look at alternative fixings like toggle bolts or spring toggles. Similarly, for heavy-duty applications—think wall-mounted TVs or heavy shelving—you’ll need something more robust like chemical anchors or expansion bolts.
How to Install Nylon Nail-In Anchors Step by Step
Tools and Materials You’ll Need
Gather your gear before starting. You’ll need a hammer drill with a masonry bit matching your anchor size, safety glasses, a vacuum or brush to clear dust, and of course, your nylon nail in anchor sydney. A pencil for marking positions and a spirit level for alignment are also handy.
Drilling the Perfect Pilot Hole
Mark your drilling position clearly. Set your drill to hammer mode and drill a hole that’s the same diameter as your anchor—typically between 5mm and 8mm for most standard sizes. Drill slightly deeper than the anchor length to allow for any debris at the bottom.
Clear the hole thoroughly using a vacuum or by blowing out the dust. Remaining debris can prevent the anchor from seating properly and reduce its holding power significantly.
Inserting the Anchor Correctly
Push the nylon sleeve into the hole by hand. It should fit snugly—not too loose, not requiring excessive force. If it slides in too easily, the hole’s too large. If you can’t push it in at all, check your drill bit size.
Driving the Nail for Maximum Hold
Position your fixture over the anchor, then drive the nail through the fixture’s mounting hole and into the anchor using a hammer. Strike firmly but controlled—you want the nail fully seated without damaging the fixture or the anchor head.
What Size Nylon Nail-In Anchor Do I Need?
Matching Anchor Size to Your Fixture Weight
Choosing the right size comes down to two factors: the weight you’re hanging and the material you’re fixing into. For very light items under 5kg, a 5mm x 25mm anchor typically suffices. Medium loads between 5-15kg often require 6mm x 40mm or similar. Always check the manufacturer’s load ratings.
Understanding Diameter and Length Requirements
Diameter affects the hole size and expansion grip. Length determines how deeply the anchor embeds into the wall material. For thin materials or hollow sections within masonry, longer anchors provide better engagement with the solid portion behind.
Common Sizing Mistakes to Avoid
Using anchors that are too short for the job is a frequent error. Another mistake is assuming all walls are equally dense—older brickwork can be softer and may need larger or longer anchors to compensate.
Can Nylon Nail-In Anchors Be Used in Plasterboard?
Short answer: not really. Nylon nail-in anchors rely on the expansion mechanism gripping solid material. Plasterboard is too soft and crumbly to provide adequate resistance. The anchor will simply spin or pull through under load.
For plasterboard applications, consider purpose-designed fixings like self-drilling plasterboard anchors, spring toggles, or metal hollow-wall anchors. These spread the load across a larger area of the plasterboard’s back surface, providing much better holding power.
How Much Weight Can a Nylon Nail-In Anchor Hold?
Load capacity varies depending on anchor size and wall material. In quality concrete, a 6mm nylon nail-in anchor might hold 20-30kg in shear (downward force) and somewhat less in tension (pulling away from the wall). Brick and blockwork typically offer slightly lower capacities.
Always check the specific product’s datasheet and apply a safety factor. If the maximum rated load is 30kg, don’t hang anything heavier than 15-20kg. Walls aren’t always perfect, and unexpected stresses can occur.
Common Mistakes When Using Nail-In Anchors (And How to Avoid Them)
Drilling Holes That Are Too Large or Too Small
This is the number one issue. A hole that’s too large means the anchor can’t expand enough to grip properly. Too small, and you’ll struggle to insert the anchor or risk cracking it. Match your drill bit exactly to the anchor diameter specified on the packaging.
Using the Wrong Anchor for the Wall Material
Not all walls are created equal. What works brilliantly in dense concrete might fail completely in aerated blocks or lightweight masonry. Test a small section first if you’re unsure about the wall composition.
Over-Driving or Under-Driving the Nail
Hammering too hard can damage the anchor head or push it too deep, compromising the fixture. Not driving it fully means the expansion won’t complete properly. Aim for the nail to sit flush with the anchor head, with the fixture securely clamped.
Are Nylon Anchors Better Than Plastic Wall Plugs?
It depends on your application. Nylon nail-in anchors offer speed and convenience for permanent, light-to-medium duty fixings. Traditional plastic wall plugs with separate screws provide adjustability—you can remove and reuse them more easily.
For quick, one-time installations in masonry where you won’t need to remove the fixture later, nail-in anchors often prove more efficient. For fixtures you might adjust or relocate, stick with conventional plugs and screws.
Tips for Removing Nylon Nail-In Anchors Without Damaging Walls
Removing nail-in anchors requires patience. Try gripping the nail head with pliers and gently working it back and forth while pulling. Sometimes heating the nylon slightly with a heat gun softens it enough to extract more easily.
If the nail won’t budge, you can drive it deeper into the wall, then fill over the hole. Alternatively, drill out the anchor using a slightly larger bit, though this creates a bigger hole to repair afterwards.
Where to Buy Quality Nylon Nail-In Anchors in Australia
Quality matters with anchors—cheap options often have inconsistent tolerances or brittle nylon that fails under load. Bunnings and Mitre 10 stock reliable brands, as do specialist fastener suppliers like Würth, ITW Buildex, or Hobson Engineering.
For trade quantities, wholesale fastener distributors often offer better pricing. Always look for anchors that meet Australian Standards and come with clear load ratings for different substrates.
Getting the Best Results Every Time
Nylon nail-in anchors are genuinely brilliant fixings when used correctly. They combine speed, reliability, and affordability in a package that suits countless everyday applications. The key takeaways? Match your anchor size to both your fixture weight and wall material, drill precise holes, and clear debris before insertion.
Remember that these anchors excel in solid masonry but aren’t suitable for plasterboard or heavy loads. When in doubt, size up rather than down—a slightly oversized anchor rarely causes problems, but an undersized one certainly will.
Armed with these tips, you’re ready to tackle your next mounting project with confidence. Whether you’re securing cable clips in the garage or hanging artwork on a brick feature wall, those nylon nail-in anchors will serve you well. Happy fixing!
Looking for stronger, safer and more reliable wall fixings? Follow these expert nylon nail-in anchor installation tips to achieve professional results on every project.